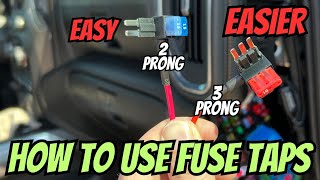
Understanding the 3 Amp Mini Fuse
The 3 amp mini fuse is a compact, low‑current protective device commonly used in electronic circuits, automotive accessories, and small appliances. Its primary purpose is to interrupt the flow of electricity when a fault causes the current to exceed 3 amperes, thereby preventing damage to components, wiring, or even fire hazards. Mini fuses are typically housed in a cylindrical glass or ceramic body with metal end caps, making them easy to install in a variety of fuse holders or printed‑circuit‑board (PCB) footprints.
Key Features and Typical Specifications
While exact specifications can vary among manufacturers, most 3 amp mini fuses share a core set of characteristics:
- Current rating: 3 A (continuous)
- Voltage rating: 250 V AC or DC, suitable for most low‑voltage applications
- Breaking capacity: Typically 200 A to 300 A, indicating the maximum fault current the fuse can safely interrupt
- Time‑current characteristic: Fast‑acting (blow in milliseconds) for sensitive electronics, or slow‑blow (time‑delay) for circuits with brief inrush currents
- Physical size: Standard mini (5 × 20 mm) or sub‑mini (3 × 10 mm) form factors
Common Applications
Because of its modest current rating, the 3 amp mini fuse is ideal for protecting low‑power devices where overcurrent conditions are possible but severe currents are unlikely. Typical uses include:
- LED lighting strips and driver circuits
- Portable battery chargers and power banks
- Automotive accessories such as interior lights, audio amplifiers, and sensor modules
- Home‑automation modules, smart switches, and thermostats
- Small hobbyist projects involving Arduino, Raspberry Pi, or similar microcontroller platforms
Choosing the Right 3 Amp Mini Fuse
Selecting an appropriate fuse involves more than just matching the 3‑amp rating. Consider the following factors to ensure reliable protection:
1. Fast‑Blow vs. Time‑Delay
Fast‑blow fuses react instantly to overcurrent, making them suitable for delicate semiconductor devices. Time‑delay (slow‑blow) fuses tolerate brief surge currents—common in motor start‑up or capacitor charging—without nuisance blowing.
2. Voltage Rating
Confirm that the fuse’s voltage rating exceeds the maximum circuit voltage. Using a fuse with a lower voltage rating can lead to arcing inside the fuse body during a fault.
3. Breaking Capacity
Even though a 3 amp fuse protects low‑current circuits, the breaking capacity should comfortably exceed the highest possible fault current in the system. This prevents the fuse from rupturing or causing a secondary hazard.
4. Physical Compatibility
Check the dimensions of the fuse holder or PCB footprint. Standard mini fuses (5 × 20 mm) are the most widely supported, but some compact designs may require sub‑mini parts.
Installation Tips and Safety Practices
Proper installation ensures the fuse performs as intended and reduces the risk of accidental damage. Follow these guidelines:
- Power down the circuit and disconnect any power source before handling the fuse.
- Inspect the fuse for visible damage such as a cracked glass envelope or discolored end caps; replace any compromised units.
- Insert the fuse fully into its holder, ensuring the metal caps make solid contact with the terminals.
- Verify polarity if the holder is marked, especially for fuses with a built‑in polarity indicator.
- After installation, restore power and test the circuit. If the fuse blows immediately, re‑evaluate the load or check for wiring errors.
Troubleshooting Common Issues
When a 3 amp mini fuse repeatedly blows, the underlying problem is usually one of the following:
- Overloaded circuit: The connected load may draw more than 3 A under normal operation. Measure the current and consider a higher‑rated fuse if the design permits.
- Short circuit: A direct connection between supply and ground can cause a rapid current surge. Inspect wiring for exposed conductors or solder bridges.
- Inrush current: Certain devices, like motors or large capacitors, generate a brief surge that exceeds the fuse rating. Switching to a time‑delay fuse can resolve this without compromising protection.
- Faulty component: A defective transistor, diode, or other active part may draw excessive current. Replace the faulty component and retest the circuit.
Buying Guide: What to Look for in a Reliable Supplier
When purchasing 3 amp mini fuses, prioritize quality and consistency. Reputable manufacturers adhere to international standards such as IEC 60269‑1, ensuring that the fuses meet defined performance criteria. Look for the following indicators:
- Clear marking of current, voltage, and breaking capacity on the fuse body.