What Are LED Mini Strip Lights?
LED mini strip lights are flexible, low‑profile lighting solutions that consist of a series of surface‑mount LEDs mounted on a thin adhesive backing. Their compact size—often as narrow as 2 mm—makes them ideal for tight spaces, decorative accents, and detailed electronics projects. Because they operate at low voltage and are UL listed, they provide a safe and energy‑efficient way to add illumination to almost any surface.
Key Benefits of Ultra‑Narrow LED Mini Strips
Choosing an ultra‑narrow strip offers several practical advantages:
- Space‑saving design: The 2 mm width fits into gaps that standard strips cannot reach.
- Flexibility: The thin silicone or PVC backing bends easily around corners and curves.
- Low power consumption: LEDs draw minimal current, reducing electricity costs.
- Long lifespan: Quality LEDs can last up to 50,000 hours, far longer than incandescent bulbs.
- Safety: Low‑voltage operation and UL listing meet industry safety standards.
How to Install LED Mini Strip Lights
Installation is straightforward, but a few steps ensure a reliable connection. Below is a concise guide that mirrors the video tutorial on how to install, cut and connect the strips.
Materials Needed
- LED mini strip lights (ultra‑narrow 2 mm preferred)
- 18‑22 AWG stranded wire
- Soldering iron and solder
- Heat‑shrink tubing or electrical tape
- Scissors or a sharp cutting tool
- Power supply matching the strip’s voltage rating
Step‑by‑Step Installation
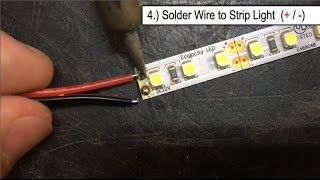
- Measure and cut: Mark the cut line at the designated solder points printed on the strip. Use scissors to cut cleanly.
- Strip the wire: Remove about 5 mm of insulation from each end of the stranded wire.
- Solder the connection: This short video shows you how simple it is to solder 18‑22 AWG stranded wire to our low voltage UL listed strip. Heat the pad, apply solder, and attach the wire, ensuring a solid joint.
- Insulate: Slide heat‑shrink tubing over the soldered joint and apply heat, or wrap with electrical tape.
- Attach the strip: Peel off the adhesive backing and press the strip onto a clean, dry surface.
- Connect power: Plug the power supply into the strip’s connector, respecting polarity.
- Test the lights: Turn on the power to verify even illumination.
Common Mistakes and How to Avoid Them
Even experienced hobbyists can encounter pitfalls. Here are some lessons learned from my share of mistakes when it comes to LED strip projects:
- Incorrect wire gauge: Using wire that is too thin can cause voltage drop. Stick to 18‑22 AWG for reliable performance.
- Cutting at the wrong spot: Only cut at the marked solder points; otherwise, you risk damaging the circuit.
- Overheating the strip: Excessive soldering heat can delaminate the adhesive backing. Apply heat briefly and precisely.
- Skipping insulation: Unprotected solder joints can short out, especially in humid environments.
- Ignoring polarity: Reversing the positive and negative leads will prevent the LEDs from lighting.
Applications for Engineering Students and Hobbyists
LED mini strip lights are versatile tools for a range of projects, including:
- Simple breadboard projects: Use strips to illuminate prototypes or indicate circuit status.
- Custom display panels: Create low‑profile backlighting for LCDs or information boards.
- Wearable electronics: Integrate strips into costumes or LED‑enhanced apparel.
- Architectural accents: Add subtle lighting under cabinets, along stair risers, or inside cabinets.
- DIY lighting fixtures: Build compact lamps or nightlights for personal spaces.
Buying Guide: What to Look For
When selecting LED mini strip lights, consider the following criteria to ensure you get a product that meets your needs:
- Width: Ultra‑narrow 2 mm strips are ideal for tight installations.
- Voltage: Choose a low‑voltage strip (typically 12 V or 24 V) that matches your power supply.
- LED type: Standard LEDs provide bright white or colored light; RGB strips add color‑changing capabilities.
- UL listing: Verify that the strip is UL listed for safety compliance.
- Connector options: Look for pre‑soldered connectors if you prefer a tool‑free setup.
- Warranty: A manufacturer warranty indicates confidence in product durability.
Safety Tips and When to Seek Professional Help
While LED mini strip lights are low‑voltage, proper handling is essential:
- Always disconnect power before making any connections.
- Do not attempt to install or modify strips if you are unfamiliar with basic electrical safety.
- If you encounter complex wiring or need to integrate the strip into a high‑current system, don’t buy or install without consulting a qualified electrician.
Conclusion
LED mini strip lights—especially the ultra‑narrow 2 mm varieties—offer a flexible, energy‑efficient way to add illumination to projects ranging from simple breadboard experiments to sophisticated interior lighting. By following the installation steps, avoiding common mistakes, and selecting a UL‑listed, low‑voltage product, you can achieve reliable and safe results.
Ready to start your next lighting project? Buy Now and explore the possibilities of LED mini strip lights today.