Mini Chocolate Cheesecake Recipe: A Decadent Bite‑Size Delight
When you crave the rich, velvety texture of chocolate cheesecake but want a portion that’s perfect for a party platter or a personal treat, a mini version is the answer. This mini chocolate cheesecake recipe delivers the classic flavor of a traditional cheesecake in a compact, individually sized format that bakes quickly and looks impressive on any dessert table.
Why Choose Mini Cheesecakes?
Mini cheesecakes have several practical advantages. Each serving is already portioned, so you avoid the guesswork of cutting a large cake. They also bake more evenly, reducing the risk of a cracked surface. Because they are small, you can experiment with toppings—such as fresh berries, whipped cream, or a drizzle of caramel—without committing to a whole cake.
Ingredients
Gather the following items before you begin. All ingredients are measured in standard U.S. units for convenience.
- 150 g dark chocolate (70 % cocoa), chopped
- 150 g cream cheese, softened
- 80 g granulated sugar
- 2 large eggs, room temperature
- 1 teaspoon vanilla extract
- 60 ml sour cream
- 30 g all‑purpose flour
- 120 g chocolate cookie crumbs (or crushed chocolate wafer biscuits)
- 30 g unsalted butter, melted
- Pinch of salt
Equipment Needed
Using the right tools helps the mini cheesecakes turn out smooth and consistent.
- Twenty‑four (24) 2‑inch ramekins or silicone muffin cups
- Mixing bowls (one for crust, one for filling)
- Electric mixer or sturdy whisk
- Spatula
- Small saucepan or microwave‑safe bowl for melting chocolate
- Oven preheated to 325 °F (165 °C)
- Cooling rack
Preparing the Crust
The chocolate cookie crust provides a buttery, crunchy foundation that complements the silky filling.
Step 1 – Combine Crust Ingredients
In a medium bowl, mix the chocolate cookie crumbs, melted butter, and a pinch of salt until the crumbs are evenly coated and the mixture holds together when pressed.
Step 2 – Press Into Ramekins
Evenly distribute the crumb mixture among the ramekins, pressing firmly with the back of a spoon to form a compact layer about ¼‑inch thick. Place the ramekins on a baking sheet for easy transfer to the oven.
Making the Chocolate Cheesecake Filling
Step 3 – Melt the Chocolate
Combine the chopped dark chocolate with 2 tablespoons of the melted butter in a heat‑proof bowl. Melt gently over a simmering pot of water (bain‑marie) or in short bursts in the microwave, stirring until smooth. Set aside to cool slightly.
Step 4 – Cream the Cheese and Sugar
In a large mixing bowl, beat the softened cream cheese with the granulated sugar until the mixture is light and free of lumps. This usually takes about 2‑3 minutes on medium speed.
Step 5 – Incorporate Eggs and Flavorings
Add the eggs one at a time, beating just until incorporated. Over‑mixing can introduce excess air, which may cause cracks. Stir in the vanilla extract and sour cream for added richness.
Step 6 – Blend in Chocolate and Flour
Pour the melted chocolate into the cheese mixture, folding gently with a spatula until fully combined. Sift the flour over the batter and fold just until the flour disappears. The batter should be glossy and thick.
Assembling and Baking
Step 7 – Fill the Ramekins
Using a spoon or a small ice‑cream scoop, divide the batter evenly among the prepared crusts, filling each ramekin to within ¼‑inch of the top.
Step 8 – Bake the Mini Cheesecakes
Place the baking sheet in the preheated oven. Bake for 18‑22 minutes, or until the edges are set and the centers still have a slight wobble. The gentle bake at 325 °F helps prevent the tops from over‑browning.
Step 9 – Cool Gradually
Turn off the oven, crack the door open, and let the cheesecakes sit inside for 10 minutes. This gradual cooling reduces the chance of cracks forming. Then transfer the ramekins to a cooling rack and chill for at least 2 hours, or overnight for best texture.
Serving Suggestions
Mini chocolate cheesecakes are versatile. Here are a few ideas to elevate the presentation:
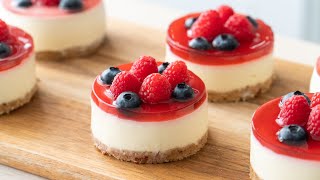
- Berry topping: Add a spoonful of fresh raspberries or sliced strawberries for a burst of acidity.
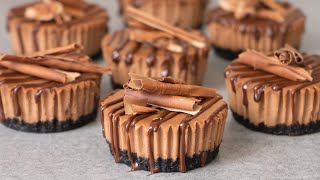
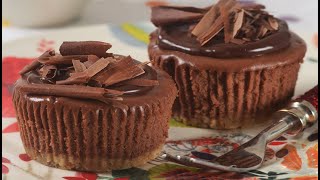
- Chocolate drizzle: Melt a little extra dark chocolate and pipe a thin line across each cheesecake.