Understanding Mini Light Replacement Bulbs
Mini lights are the small, often cylindrical bulbs that illuminate instrument panels, side mirrors, interior trim, and exterior markers on many vehicles. Because they are tucked away in tight spaces, they can be overlooked during routine maintenance, yet a burned‑out mini bulb can compromise safety and aesthetics. Replacing these bulbs is a straightforward task that saves money and keeps your vehicle looking and functioning its best.
Why Replace Mini Lights?
There are several practical reasons to replace mini light bulbs promptly:
- Visibility: Dim or dead bulbs reduce the clarity of gauges, making it harder to monitor speed, fuel level, and warning lights.
- Safety: Exterior mini lights, such as side marker or turn‑signal bulbs, are required by law in many jurisdictions. A non‑functional bulb can lead to traffic citations.
- Appearance: A flickering or dark interior light can give a vehicle a neglected look, especially in luxury or classic cars where attention to detail matters.
- Energy Efficiency: Upgrading to newer LED mini bulbs can lower power draw, extending battery life and reducing heat inside the vehicle.
Types of Mini Light Bulbs
When shopping for replacement bulbs, you’ll encounter three main technologies:
Incandescent Mini Bulbs
These are the traditional glass bulbs that have been used for decades. They are inexpensive and easy to install, but they generate more heat and have a shorter lifespan—typically 500 to 1,000 hours.
Halogen Mini Bulbs
Halogen bulbs add a small amount of halogen gas to the filament, which increases brightness and extends life to about 1,500 hours. They are a common upgrade for drivers who want a brighter light without switching to LEDs.
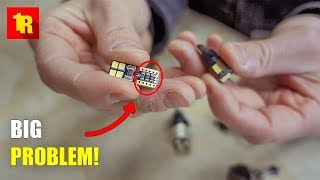
LED Mini Bulbs
LED (light‑emitting diode) mini bulbs are the most modern option. They consume far less power, produce little heat, and can last up to 30,000 hours. LEDs also offer a range of color temperatures, from warm amber to crisp white, allowing you to match the original look or create a modern aesthetic.
Choosing the Right Replacement Bulb
Selecting a compatible mini bulb involves a few key steps:
- Identify the bulb size: Mini bulbs are designated by codes such as T5, T10, or 194. The code is usually printed on the old bulb or listed in the vehicle’s owner manual.
- Check the voltage: Most automotive mini bulbs operate at 12 V, but some specialty lights (e.g., certain interior ambience lamps) may use 24 V.
- Consider the socket type: Some bulbs have a wedge base, while others use a bayonet or push‑in connector. Matching the connector ensures a secure fit.
- Decide on technology: If you value longevity and low power draw, LED is the best choice. For a cost‑effective upgrade, halogen offers a balance of brightness and price.
- Verify legal compliance: Exterior bulbs, especially turn signals and side markers, must meet local lighting regulations. Look for bulbs labeled “DOT approved” or “E‑mark” where applicable.
Step‑by‑Step Guide to Replacing Mini Light Bulbs
Below is a generic procedure that works for most vehicles. Always consult your owner’s manual for model‑specific instructions.
Tools and Materials
- Replacement mini bulbs (correct size and type)
- Flat‑head or Phillips screwdriver (depending on fasteners)
- Gloves or a clean cloth (to avoid oil on the bulb)
- Safety glasses
Installation Process
- Turn off the vehicle and disconnect the battery: This prevents accidental short circuits, especially when working with exterior lights.
- Locate the bulb housing: Mini bulbs are often behind a plastic cover or inside a bezel. Common locations include the instrument cluster, glove box, door panels, and side‑marker housings.
- Remove the cover: Use the screwdriver to gently pry off any screws or clips holding the cover in place. Keep the screws in a safe spot for reassembly.
- Extract the old bulb: Depending on the socket, you may need to twist, pull, or release a retaining clip. Avoid pulling on the glass; instead, grip the base.
- Handle the new bulb correctly: For incandescent and halogen bulbs, wear gloves or a cloth to keep fingerprints off the glass. For LEDs, avoid touching the LED chips directly.
- Insert the new bulb: Align the pins or base with the socket and press until it seats firmly. If the bulb has a retaining clip, re‑engage it.
- Test the bulb: Reconnect the battery temporarily and turn on the relevant light switch to confirm illumination. If the bulb does not light, double‑check the connection and polarity (LEDs are polarity‑sensitive).
- Reassemble the housing: Replace the cover and secure any screws or clips.
- Final check: With