Why Choose Mitsubishi Mini Split Systems?
When homeowners look to upgrade their heating and cooling, Mitsubishi mini split units consistently rank among the top choices. These ductless systems deliver precise temperature control, high energy efficiency, and a sleek design that blends seamlessly with any interior décor. Because they operate without extensive ductwork, Mitsubishi mini splits are ideal for retrofits, additions, and homes where traditional HVAC installation would be costly or invasive.
Preparing for a Mitsubishi Mini Split Installation
Before you schedule your installation, there are a few essential steps to ensure a smooth process:
- Assess Your Home’s Layout – Identify the rooms or zones that need heating and cooling. Mitsubishi mini splits work best when each indoor unit is matched to a specific space.
- Determine the Right Capacity – A qualified technician will calculate the BTU requirements based on square footage, insulation quality, and local climate.
- Check Electrical Requirements – Mini split systems need a dedicated circuit. Verify that your electrical panel can accommodate the unit’s amperage.
- Choose a Reputable Installer – Look for certified contractors with experience in ductless technology. In North Georgia, T&N Services LLC offers professional Mitsubishi HVAC services and can guide you through the entire process.
Step‑by‑Step Guide to a Successful Installation
A detailed, step‑by‑step guide helps homeowners understand what to expect on installation day. Below is an overview of the typical workflow performed by certified technicians.
1. Site Survey and Planning
The installer conducts a thorough site survey, measuring wall space for indoor units and locating an optimal spot for the outdoor condenser. This stage includes:
- Confirming clearances for airflow and maintenance access.
- Marking drilling locations for refrigerant lines and electrical wiring.
- Discussing aesthetic preferences, such as hidden line covers or decorative mounting plates.
2. Mounting the Indoor Units
Indoor units are affixed to the wall using a mounting bracket. The bracket is leveled, secured with screws, and checked for stability. Once the bracket is in place, the unit is hung and leveled to ensure even distribution of air.
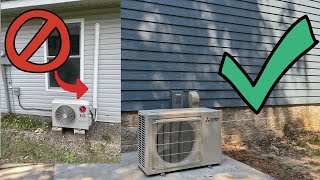
3. Installing the Outdoor Condenser
The outdoor unit is positioned on a concrete pad or a sturdy wall bracket. Proper spacing—usually at least 24 inches from the wall and 12 inches from the ground—is essential for optimal airflow. The installer then connects the refrigerant lines, drainage hose, and electrical conduit.
4. Refrigerant Line and Electrical Connections
Refrigerant lines are carefully threaded through the wall, using insulated sleeves to prevent condensation. The technician evacuates the system, charges it with the correct amount of refrigerant, and verifies pressure levels. Electrical connections are made to a dedicated breaker, and a low‑voltage control wire links the indoor and outdoor units.